Your first ticket
This article walks through opening a ticket, reading the customer’s message, writing a reply, and sending it. Throughout, we use a real warranty claim from Sole Provider Inc, the running-equipment supplier we use as our running example.
1. Pick a ticket from the list
Open the ticket browser. With your For My Attention perspective active, you will see the tickets that need you to do something. Click anywhere on a row (other than the checkbox) to open the ticket.
For this walkthrough we will respond to #220009 — “Carbon plate cracked on first marathon — warranty?”, an Urgent ticket from Marcus Whitfield at Trailblazers Running Club.
2. Read the message and the ticket facts
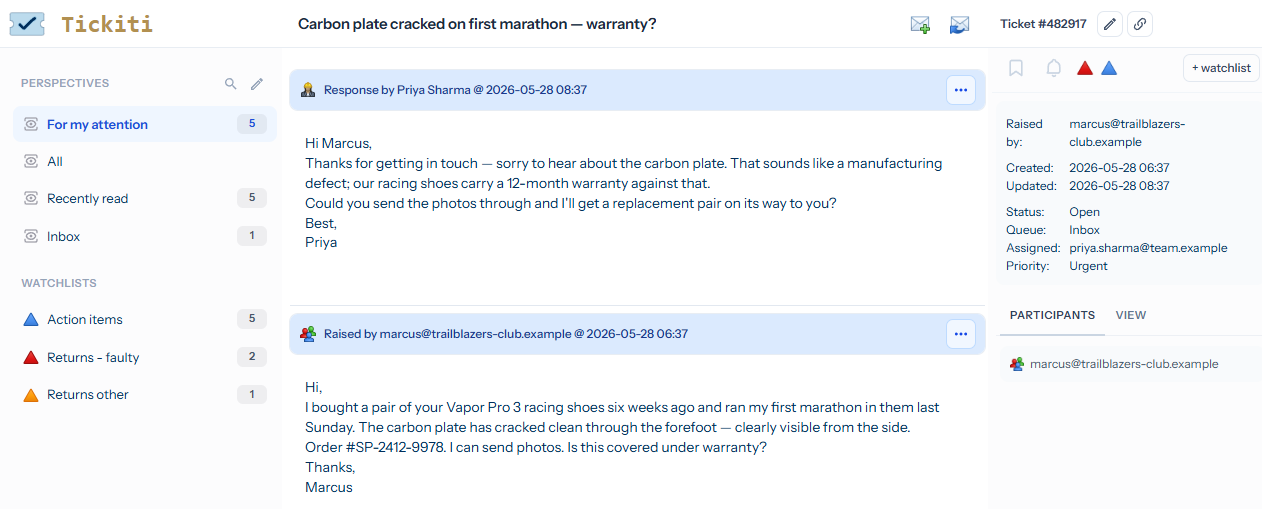
The opened ticket has three things to look at:
- The conversation in the centre. The most recent message is at the top — in this case Marcus’s warranty claim, with the order reference
SP-2412-0489and the mileage on the shoes. Below it is an audit entry showing the customer’s name, company and email, captured automatically when the ticket was created. Tickets accumulate further audit rows as their state changes; by default Tickiti shows only the first, with the rest available via the response filters. - The summary panel on the right. The header shows the ticket number; the rows below summarise Status, Queue, Assigned to and Priority. Below that is the Participants list — everyone who can see and respond to this ticket.
- Response filters at the bottom of the side panel. Use these to hide audit rows, show only public responses, or only your team’s internal notes.
Take a moment before replying: do you have what you need? In this example, Marcus has supplied an order reference but no photos. We will ask for those in the reply.
3. Click Reply
The Reply button opens the response composer above the conversation. There is just one composer for every kind of response — the ticket subject is editable at the top, with a formatting toolbar and an attachments dropzone in the side panel.
You decide what kind of response it is when you post it. Public sends the message to the customer; Staff keeps it as an internal note visible only to your team. See Response types for the full list.
4. Write the response
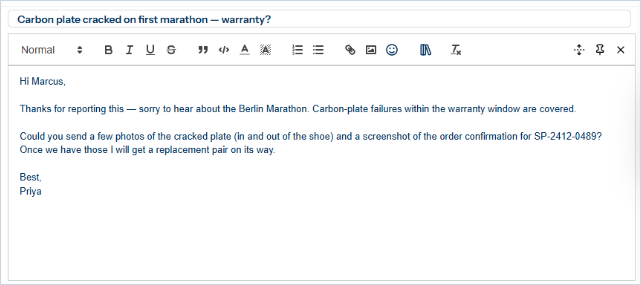
Type your reply in the editor. You can use the toolbar for formatting (bold, italic, lists, links, code, blockquotes), drop image files into the body, or drag attachments into the dropzone on the right. The composer autosaves as you type, so closing the tab by accident does not lose your work.
A good first reply usually does three things:
- Acknowledges the situation in human terms.
- Tells the customer what you can do for them, or what you need to find out.
- Asks for any information you are missing — in this case, photos of the cracked plate and a screenshot of the order confirmation.
If the reply is one you write often (a request for an order reference, a returns-policy reminder, anything boilerplate), you can drop in a stock response from the editor toolbar instead of retyping it.
5. Send
When you are happy with the response, click Send. Tickiti will:
- Append your reply to the conversation.
- Email the customer a notification with a link to view and reply.
- Update the ticket’s “last updated” time and last responder.
- Refresh the ticket list and perspectives panel for everyone watching the ticket — no page refresh needed.
6. Set status, priority, and assignment as needed
After sending, you often want to update the ticket itself, not just the conversation. The summary panel on the right is where you do this:
- Status — switch from Open to On hold while you wait for the customer’s photos, or Closed once the issue is resolved.
- Priority — drop from Urgent to High once the customer has confirmed they finished the race and there is no live race risk.
- Assigned to — pass the ticket to a colleague who handles warranty fulfilment, or keep it yourself.
That is one ticket done
You have just gone end-to-end on a ticket: read it, replied to it, and updated its state. Most of your day in Tickiti is variations on those four moves. The next articles in the Staff Guide dig into the details — response types, pinned responses, tagging, watchlists, and quick actions for the things you do dozens of times a day.