Mailbox setup
A mailbox in Tickiti is an email account it monitors for inbound tickets and/or uses to send outbound replies. This is how Tickiti's email-to-ticket handling works — connect a mailbox and Tickiti turns incoming mail into tracked tickets, so your team can manage support emails from one queue instead of a shared inbox. The mailbox library at Mail → Mailboxes (the Mail menu in the admin user-menu dropdown) is admin-only.
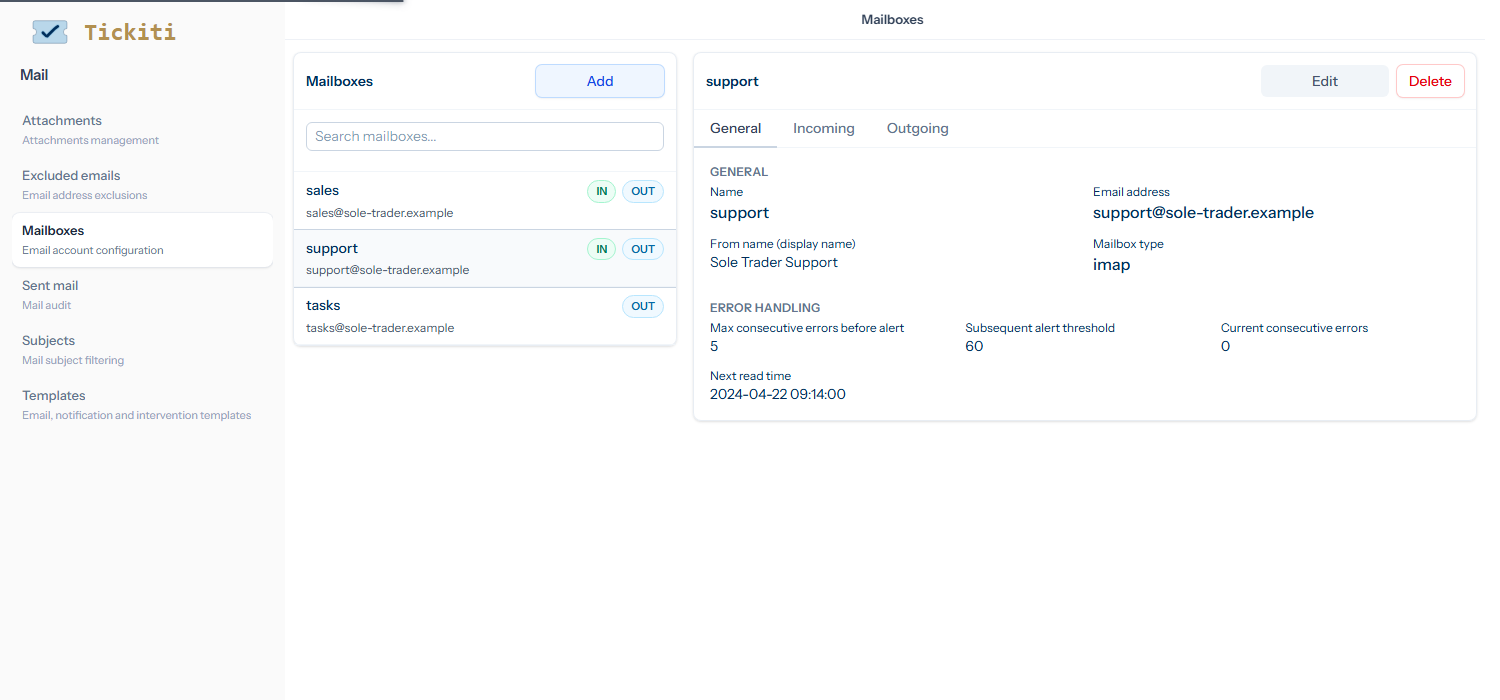
The mailbox list
Each row shows the mailbox identifier and email address, plus one or more small badges that flag its type and direction:
- TT — TTMAIL (Managed). Email handled by your Tickiti hosting; you do not configure server details yourself.
- GM — Gmail. Connected via OAuth rather than password.
- IN — inbound polling is enabled (Tickiti checks the mailbox for new mail).
- OUT — outbound sending is enabled (Tickiti can send via this account).
A mailbox can carry several badges — a typical customer-facing support address would show both IN and OUT. Direction-only mailboxes are useful for “outbound only” replies-from addresses or “inbound only” archive ingestion.
Mailbox types
When adding a mailbox, pick the type that matches your provider:
- IMAP — the general-purpose option for any provider that speaks standard IMAP. You configure host, port, encryption and credentials yourself.
- Office 365 — Microsoft 365 / Exchange Online. Uses Microsoft’s modern auth flow.
- Gmail — Google Workspace or consumer Gmail. Uses OAuth; you click Connect to Gmail to authorise the connection rather than supplying a password. The OAuth token refreshes automatically so connections do not break when users change passwords.
- TTMAIL (Managed) — mailboxes provisioned by your Tickiti hosting. The credentials and server details are managed for you; you only choose which queue inbound mail lands in.
Adding a mailbox
- Click Add at the top of the mailbox list.
- Set Name (the identifier used in lists and outgoing-mailbox dropdowns) and Email address.
- Set the From name — the display name customers see on outbound messages.
- Pick the Mailbox type. For IMAP and Office 365 you supply server details next; for Gmail you click through the OAuth flow; for TTMAIL there is nothing to configure beyond the deliver-to queue.
- On the Incoming tab, set the inbound details: host, port, encryption (typically SSL), credentials, and the Deliver to queue — the queue into which new tickets from this mailbox land (see Queue configuration). Also set the polling interval in minutes.
- On the Outgoing tab, set the SMTP details for outbound sending. Many providers use a different host/port pair for outbound than inbound.
- Save. Tickiti tests the connection and reports any failures.
Error handling
Each mailbox has a small Error handling panel that controls how Tickiti behaves when polling repeatedly fails:
- Max consecutive errors before alert — after this many polling failures in a row, Tickiti raises an inbox-error notification to the users who have the Notify inbox errors role on the destination queue (see Queue permissions).
- Subsequent alert threshold — how many additional failures must pass before Tickiti raises the alert again, to avoid spamming during an extended outage.
- Current consecutive errors — read-only counter showing how many consecutive failures the mailbox has accumulated right now. Zero when polling is healthy.
- Next read time — when the next poll is scheduled, based on the polling interval.
Routing inbound mail
The Deliver to queue field on the Incoming tab decides which queue new tickets from this mailbox land in — Inbox by default, but for specialised mailboxes (a sales@ address, a dedicated trade@) you can route directly into the matching queue.
Two further filters live in the same Mail section of Settings:
- Mail → Subjects — subject patterns Tickiti should ignore (newsletters, automated reports, out-of-office bounces).
- Mail → Excluded emails — email addresses Tickiti should ignore. Useful for marketing aggregators and mass-mail systems.
Outgoing identity
The mailbox is just an email account. The which mailbox does Tickiti send from for this ticket question is answered by the outgoing mailbox field on the ticket’s queue, not by the mailbox itself. So a sales ticket goes out via the Sales queue’s outgoing mailbox; a support ticket via the Support queue’s. See Queue configuration for the queue side of the mapping.
Testing
After adding a mailbox, send yourself a test email from a personal account. Within a poll cycle (default a few minutes) the message should appear as a new ticket in the destination queue. If it does not:
- Check the mailbox’s Current consecutive errors — if it is non-zero, polling is failing.
- If you have the Notify inbox errors role on the destination queue, check your own email for an inbox-error notification.
- Check Mail → Sent mail for any outbound failures from Tickiti’s test email; bounce details land there.
- Check the Subjects and Excluded emails filters — an incoming test message might be filtered out by an over-broad rule.