Queue permissions
Queue permissions decide which queues a user can see and act on. They are set per-user, per-queue, on the user admin page (Administration → User admin). Without a queue permission, a user cannot see tickets in that queue at all.
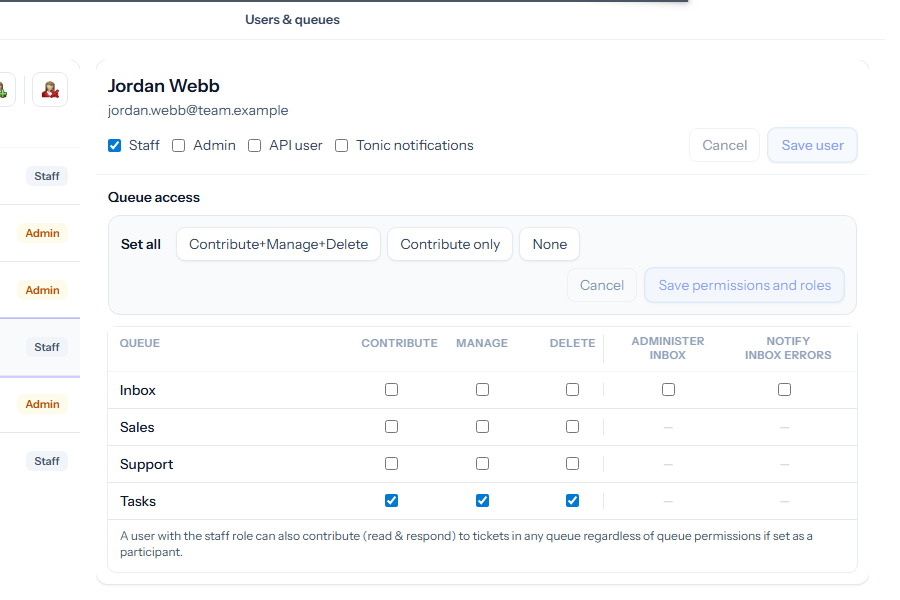
Permissions and Roles
The first three columns are permissions — what the user can do with tickets in the queue:
- Contribute — can view tickets in this queue and respond to them. The base level for any agent who works on a queue.
- Manage — can change ticket attributes (queue, status, priority, assignee) and merge/clone/link tickets.
- Delete — can permanently delete tickets in this queue. Use sparingly.
The remaining two columns are not permissions but roles — they nominate the user for a duty rather than grant an action they choose to take. They appear only for queues that are the target of a mailbox (see Mailbox setup); for any other queue the columns are greyed out.
- Administer inbox — nominates the user as an inbox administrator for this queue. They are the fallback recipient for escalations on unassigned tickets and are auto-added as a participant on tickets that arrive without an assignee. Not restricted to the built-in Inbox queue — any mailbox-target queue can have inbox administrators.
- Notify inbox errors — when the mailbox feeding this queue runs into trouble (repeated fetch failures, authentication problems and similar), the user receives an inbox-error notification.
The three columns are independent toggles — the form will let you tick Manage without Contribute — but the combinations only really make sense when stacked: Manage without Contribute means “can change a ticket’s queue/status/priority on a queue they cannot see”, which is rarely what you want. The Set all shortcuts (below) bundle them in the sensible combinations.
System-level permissions model
Tickiti has a system-wide Permissions model setting at System settings → Permissions with two values: Permissive and Restrictive. This decides how new queues are set up when an admin creates one:
- Permissive (the default) — a newly created queue is automatically granted Contribute + Manage + Delete to every staff user. Good for small teams who treat all queues as open by default and want exceptions to be the exception.
- Restrictive — a newly created queue starts with no permissions. The admin has to grant access deliberately to the staff who need it. Good for larger teams where queues correspond to separate functions and cross-access should be opt-in.
The setting only affects what happens at queue-creation time; it does not retroactively change existing per-queue permissions. Switching from Permissive to Restrictive later does not strip access from any queues that already have it.
The shortcut buttons
The Set all row above the table gives you three one-click presets:
- Contribute+Manage+Delete — full access on every queue. Suitable for senior agents and team leads.
- Contribute only — baseline access. Suitable for junior agents while they get up to speed.
- None — no access. Use this on accounts that should not see tickets at all (e.g. read-only API users).
You can then refine per-queue: most users will be Contribute on most queues but Manage on the queues they own.
Saving
The table is editable in place. Tick or untick boxes, then click Save permissions and roles. Changes take effect immediately; the affected user sees the new permissions on their next page load.
Staff role and participants
Note the small note at the bottom of the table: a user with the Staff role can contribute (read & respond) to any ticket they are explicitly added as a participant on, regardless of queue permissions. This is how you give a colleague one-off access to a single ticket without granting them the whole queue.
The pattern
- Define your queue set first (see Queue configuration).
- Decide for each role (junior agent, senior agent, supervisor, admin) which queues they need and at what level.
- When adding a new user, apply the closest role-shaped pattern via Set all, then refine.
- Audit periodically — queue permissions tend to accumulate.