Creating tickets
Most Tickiti tickets are raised by customers via email or the support portal. This article covers the cases where you, as staff, need to create a ticket from scratch — for example to log a phone call, capture an internal task that the team needs to track, or follow up on something a customer mentioned in passing.
Starting a new ticket
From the ticket browser, click the envelope-with-plus icon in the top-right corner. Tickiti creates a draft ticket and drops you straight into it:
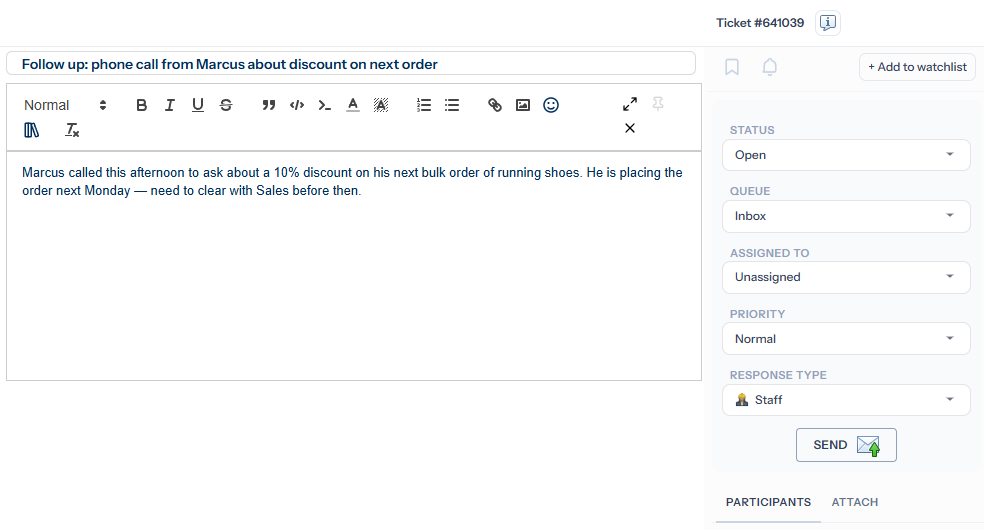
The new ticket is automatically saved into the Drafts perspective until you send it — you cannot lose work just by closing the tab.
Filling in the ticket
- Subject — the box marked A subject is required …. Write something concise enough to scan in a list.
- Body — the response composer underneath. Write the first message: an outline of the situation, with any details, references, or links you have.
- Attachments — click the Attach tab at the bottom of the side panel to reveal the dropzone, then drop files in if relevant.
- Add participants — the Participants tab at the bottom of the side panel opens by default. Click the person-add icon to add the customer’s email so they receive the ticket.
- Set priority, queue, assignee in the side panel. See Ticket status and priority and Assignment and queues.
Sending the ticket
The post button below the side-panel fields posts the ticket once the required fields are filled. Its label depends on what you have written:
- Save appears when the body is empty — it just stores the draft so you can come back later. No notifications go out.
- Send appears as soon as you have typed something in the body. If you chose a public response type, Tickiti notifies any participants by email. If you chose a staff response type, the ticket exists internally only.
While the form is incomplete the button shows a yellow validation hint instead — Queue required, Response type required, etc. — pointing at the field still to set.
Saving as a draft
You don’t need to do anything specific to save — Tickiti autosaves the draft as you type. To find your drafts later, switch to the Drafts perspective in the left-hand panel. Drafts have their own ticket numbers but are invisible to anyone else.
Discarding
If you started a ticket and decide it isn’t needed, click the close (×) icon at the right of the editor toolbar — that throws the draft away. You can also batch-delete drafts from the Drafts perspective by ticking their selection circles and using the bulk-action header.