Quick actions
Quick actions are one-click buttons in the response composer that set several ticket attributes at once. Where you might otherwise click queue, then assignee, then priority, then response type, a single quick action covers all of them. They are the fastest way to drive routine ticket transitions.
Where they appear
When the feature is enabled for your account, a QUICK ACTIONS section sits at the top of the right-hand Manage panel while a ticket is open or while you are responding:
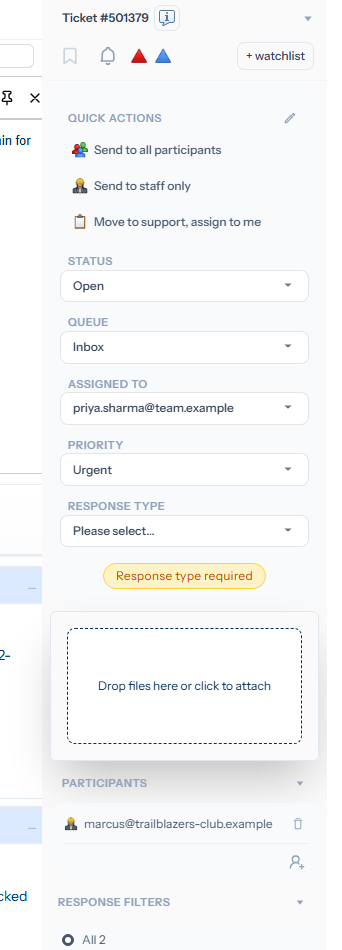
Each entry has a glyph and a label. Hovering shows its title (a longer description). Clicking applies its set of changes to the ticket; the dropdowns below update immediately so you can see exactly what was changed.
Built-in actions
Tickiti ships with a small set of common actions:
- Send to all participants — sets response type to Public.
- Send to staff only — sets response type to Staff.
- Move to support, assign to me — moves the ticket to the Support queue, assigns it to you, and sets a Staff response type for the handover note.
- On hold for one week / one month / one year — sets status to On hold with the on-hold-until date pre-filled.
- Close ticket — sets status to Closed with a Staff response type.
- Reopen ticket — sets status back to Open.
- Accept intervention(s) and close — specific to the interventions workflow; closes the ticket and accepts any pending interventions in one step.
Conditional visibility
An action only appears when it makes sense for the current ticket. Each action has a set of rules that decide when it shows; when the rules are not met the button is hidden rather than greyed out. Examples:
- Reopen ticket only shows on closed tickets.
- Close ticket only shows on open tickets.
- Move to support, assign to me hides itself once you are already the assignee in the Support queue.
The result is that the QUICK ACTIONS section trims itself to the small list of operations that are actually useful right now — you do not have to scan past irrelevant buttons.
Enabling them
Quick actions are off by default for new accounts. Turn them on under Settings → Preferences:
- Use quick actions — show the QUICK ACTIONS section in the Manage panel.
- Auto-post quick actions — experimental. When enabled, clicking a quick action immediately sends the response (or saves the attribute change if the body is empty), instead of just setting the fields and waiting for you to click Send. The behaviour is still being refined and may change; treat it as a preview rather than a stable workflow, and be aware that misclicks have no Send-button safety net.
Built-in vs personal
The actions described above are built-in: every user sees the same set, and they are not editable from the UI — not even by an administrator. They are part of the Tickiti install and stay consistent across all users. To customise the set, create personal actions of your own — for example a one-click Move to trade, assign to me, response type Staff, priority High if that is a transition you do dozens of times a day.
Open the action manager from the small pencil icon at the top of the QUICK ACTIONS section, and click + New action. Each action has:
- A name (the label shown on the button), a title (the longer description shown on hover) and a glyph.
- Action fields — status, queue, assignee, priority, response type, on-hold period, and whether to apply pending interventions. Anything you set here is what the action will apply.
- Rule fields — the conditions under which the action appears. You can require a particular current status, queue, assignee or priority, or whether the ticket has subject text, response content, a response-type already chosen, or unaccepted interventions.
The first time you create a personal action Tickiti warns you that doing so creates a personal copy of all built-in actions and stops showing the built-ins (so your overrides do not collide with them). You can revert to built-ins later by deleting all your personal actions, or by clicking Reset to built-ins in the action manager.
Drag-to-reorder
In the action manager, click Reorder list to drag personal actions into the order you want them shown. The order in the manager is the order they appear in the QUICK ACTIONS section.